One of the best things about cloud accounting apps such as Xero is that you can connect them easily to other powerful cloud apps. As Xero has developed it has added more connections to one of the biggest cloud companies of them all, Google.
Each year it feels like another part of Xero connects to another part of Google. In this post we look at all the ways the two apps work together and how you can use these linkages to save you a lot of time.
Exclusive Bonus: Download the two step-by-step checklists that show you how to connect and use Google Maps and Gmail with Xero. Feel free to share with your staff or clients.
Xero + Google Sheets
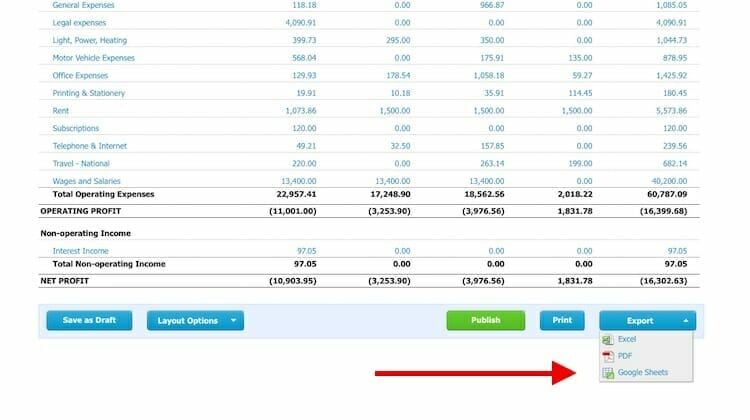
The most important connection between Xero and Google is in publishing reports. Xero can export any report to a Google Sheet (formerly Google Spreadsheet) as well as downloading XLS or CSV formats for Excel.
Why would you want to open the report in Google Sheets?
Google Sheets will automatically save itself to Google Apps or Gmail in Google Drive, the storage app in Google Apps. You can then file it into a folder if you wish, but the file is saved and backed up online from the very beginning.
This removes one extra step of saving an Excel spreadsheet to an online storage drive instead of just on the hard drive of your computer. It’s much safer to store files online where they can be viewed, edited and downloaded regardless of what happens to your laptop.
Another great advantage with Google Sheets is that it is much easier to allow others to view and edit the spreadsheet than it is with Excel. Microsoft has added co-editing to Microsoft Office but it’s easier with Google Apps and free if you use the consumer version of Google Docs and Google Sheets.
There are plenty of scenarios for exporting a report to Google Sheets rather than showing someone in Xero.
For example:
- You may want to create a tricky graph with pivot tables using the raw data from the report.
- You can share subsets of information in a report with people who don’t have access to your Xero account (and you’d like to keep it that way). For example, a legal or business adviser who is helping you with one part of the business and needs to comment on some numbers.
- You might want to show a large number of shareholders some reports but you don’t want to add them all as Xero users. Instead of sending a PDF or using a reporting app you can just push it into Google Sheets and share with the shareholders as a group.
Tip: How to share a profit and loss report with shareholders
If you want to keep the financials to yourself this is a nice way to share information in a controlled way.
- Create the profit and loss report in Xero > Reports
- Click Export button at the bottom and select Google Sheets
- The report opens in Google Sheets. Click on the folder icon to save the Google Sheet in a folder marked Shareholders.
- Use Google Sheets to add comments eg. the period occurred before fundraising.
- Create graph through Graph function
- Click on Share button in top right hand corner and add email addresses of shareholders. Change status to view instead of edit.
- Google Sheets will send an invitation to the person at each email address to view the document.
- Bonus tip: You can create an event in Google Calendar, attach the Google Sheet to it and invite all your shareholders.
- Each event in Google Calendar has a link to Google Hangouts, Google’s video-conferencing tool. In Event details the second entry is Video call. Click on the “Join meeting” link to start video-conferencing, share your screen and conduct a webinar with your shareholders. Guests do not need a Google account to watch.
Xero Contacts + Gmail
Summary (this one's a little long):
- A business can give sales staff limited access to Xero so that they can view financial history and key emails to a customer in Xero Contacts. Or an internal or external accountant or bookkeeper can view emails saved to a supplier’s contact page in Xero.
- Each Xero user can connect one Gmail account to Xero Contacts. It will show all the emails between that Gmail account and the email address stored in each contact in Xero.
- Emails shown in Xero won’t be visible by any other user in that Xero account, to maintain privacy. You can choose to save individual emails to the contact’s activity stream in Xero contacts. Emails saved to a contact in Xero can be viewed by other users in that Xero account.
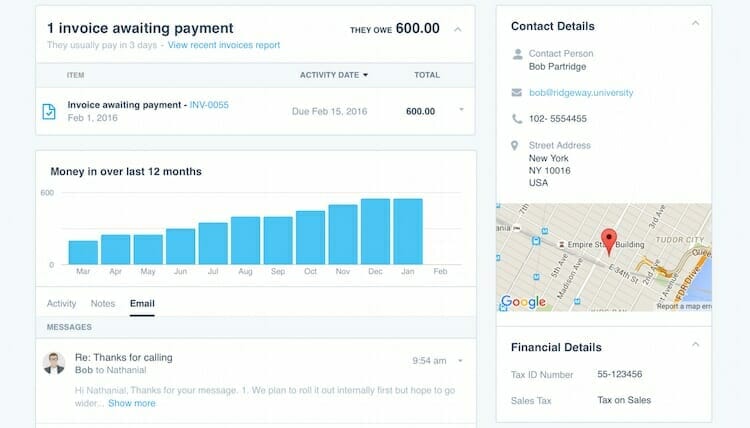
Xero Contacts is intended to be more than a static address book. The standard contact details (phone number, email, address, etc.) are listed in the right-hand sidebar. The main part of the screen is taken up with your transactional history with that contact.
The first section shows how many invoices are awaiting payment or bills are waiting to be paid. The second section shows all the activity with that contact, summarised as a graph showing money in or out over the past 12 months.
The idea is that with a glance you can get an up-to-date view of recent history and see any matters that are outstanding.
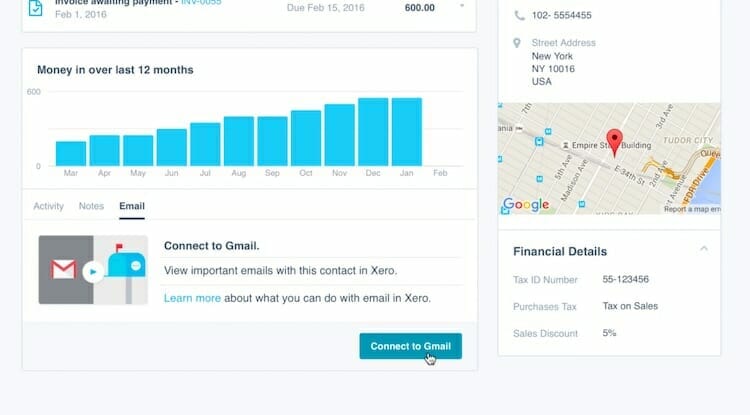
The Google connection happens underneath that graph in a section with three tabs; Activity, Notes and Email.
The Activity tab shows all the actions by users in that Xero account affecting that contact. This includes “invoice sent” notifications, edits to invoices and bills, and any notes created on invoices and bills.
You can view just the notes by looking at the second tab, Notes. Notes include auto-generated messages such as “This invoice has been sent to (contact name)” or “Statement generated by (user name)”.
However, it also includes manually entered notes, either on the invoice or billing screens or in the contact screen itself. (See the Add Note in the top right corner of the section, opposite the three tabs.)
The third tab, Email, is where you can connect a Gmail account. This can be a free Gmail account or the business-grade Gmail which is part of Google Apps, Google’s online productivity suite.
Click on the tab and then on the blue Connect to Gmail button. Your browser will load a Gmail screen asking you to approve the connection, and once approved your Gmail is now connected to Xero Contacts.
The connected email address doesn’t have to be the same one that you use to log into Xero. You can log in with one Gmail address and connect a second Gmail address to Xero’s contacts section.
How it works:
Once connected the Email tab in Xero Contacts will display all the emails sent to and from your Gmail account and the email address listed for that contact.
The list of emails in the Email tab can only be viewed by the Xero user that connected the Gmail account. Other users in the same Xero account, even those with the same access permissions, won’t be able to see any of your personal emails under the Email tab.
There is a way to add single emails to a contact so other Xero users can see them – more on that in a bit.
The emails are listed in reverse date order (latest first) and can’t be filtered or searched.
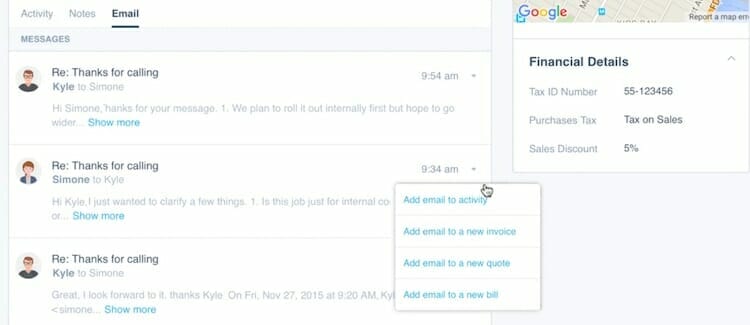
Each email has a dropdown menu in the right-hand corner – it’s a tiny grey chevron, or downwards facing arrow, that is easy to miss. The first and most important menu option is “Add email to activity”.
Clicking on this option will save a copy of the email to the Activity tab. It can then be viewed by all other users in that Xero account by looking through the activity stream.
The original email is still viewable by the original user in the email stream under the Email tab. It will also still show the option to “Add email to activity”; clicking that option will add a second copy of the email to the activity stream.
Besides adding the email to the activity stream, you can add the email directly to a new invoice, quote or bill. Selecting any of these three options will open a new invoice, quote or bill screen with the email added to the notes section underneath. Any attachments will also be added to the new invoice, quote or bill.
Attachments are shown as little icons in each email in the Email tab but are not viewable within the email itself. You need to add them to the contact first before you can view them.
A fifth option on the email menu appears if the email has an attachment. “Download attachments to contact” saves the attachment directly to the contact. It appears at the top of the right-hand sidebar to the immediate left of the Options button. A number will appear on the document icon showing how many attachments you have saved to the contact.
Limitations:
This is the first brush at integrating Gmail into Xero Contacts. Some of these limitations will hopefully be addressed in later updates.
- You can only select emails in the Email tab one at a time – it’s not yet possible to add a list of emails to the activity stream of a contact.
- As mentioned above, the email list in the Email tab is displayed in reverse chronological order. You can’t search for an email or filter the emails.
- Each Xero user can only connect one Gmail account to Xero Contacts. This is not likely to be a problem for larger businesses, but some sole traders use multiple Gmail accounts to communicate with clients. At this stage you’ll have to pick the most important one.
- Xero Contacts only allows one email address per contact. Xero only shows correspondence between the contact’s email address and the linked Gmail account. However, it is common to communicate with several people at a customer or supplier company. There is no way right now to show emails to and from other email addresses at the same company other than the one configured for the contact in Xero.
- You can’t automatically attach all emails sent to every contact. This would be useful if you’re using a customer support email (eg. hello@myfirm.com or support@myfirm.com).
Tip: Give your sales team or admin staff access to Xero Contacts
The Gmail integration can be a great way for external accountants to see what is happening inside the client’s business in relation to that customer or supplier.
If you’re running an outsourced accounting service it’s worth showing the integration to your clients and suggesting they save important emails or documents to relevant contacts. This will cut down the back-and-forth questions about documents relating to deals or payment dates for invoices.
Here’s how to add your sales staff or backoffice admin to Xero.
- Go to the Settings tab in Xero and select General Settings and then Users.
- Click the Invite a User button.
- Select Invoice Only to give the user access to just the invoices they create. The user will also be able to view all entries in Xero Contacts and either sales invoices, bills or both depending on the type of Invoice Only access you give them. Here’s a detailed comparison showing the options.
- Add the user’s name and email address and hit Continue.
- Personalise the invitation if you want to, then press Send Invite.
Xero + Google Maps
Google Maps is such a useful app. It’s a great addition to any program and Xero uses it well. The Google + Xero connection is visible in Xero Contacts and the Xero Mobile app.
Both places show the location of a customer or supplier on a map. You can click on the map to see an expanded view of the area or click on the address marker to look up directions.
Xero Contacts
In Xero click on Contacts in the main menu, then All Contacts and select one of your customers.
In the customer’s contact screen at the bottom of the right-hand sidebar headed “Contact Details” you will see a little map underneath the listed street address. (This map is only visible if you have entered a street address for the contact.)
The map has two clickable elements, discounting the “report an error with this map” link tucked into the bottom right corner.
The big orange marker in the middle of the map shows the location of the business. If you hover your cursor over it a pop-up graphic will display the street address. If you click on the marker your browser will open up Google Maps in a new tab centred on the marker for your contact’s street address.
The second element is the multi-coloured Google logo in the bottom left. Clicking on the logo also opens up Google Maps in a new tab. However, while the location is roughly similar (it’s zoomed out to show the suburb) the marker for the contact isn’t visible.
Xero Mobile
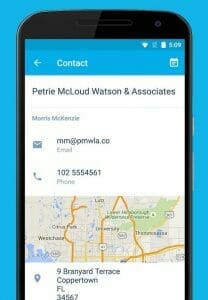
The Google Maps+Xero connection works best on a mobile device. It’s very easy to see it in action. Just open up the app on your iPhone or Android smartphone, select Contacts from the menu at the bottom of the screen and pick a contact.
The mapped address is visible immediately under the email and name for the contact person in the contact record.
Tip: How to use Xero to find directions to your client
Need to visit a client? Here is a quick way to get directions.
In Xero Contacts
- Click on the address marker in the map in the Contact window to load Google Maps in a new tab. You then have two options.
- In the left-hand panel in Google Maps click on the circular Directions button and enter your location.
- Use the tabs at the top of the blue Google Maps panel to select directions for driving, public transport, walking or bicycling.
- OR in that same blue left-hand panel click the “Send to Your Phone” button.
- Select Email or Text to receive a link to the contact’s address in Google Maps. If you have Google Maps on your phone (iPhone or Android), it will list the device as an option for sending to as well.
NB. You must be signed into the same Google account on your laptop and your smartphone to see this option.
In Xero Mobile app
- Open Xero for Mobile on iOS and Android
- Click on Contacts
- Select contact. If contact has address, Google Maps image will be displayed.
- Click on the Google Maps image to open up the map full screen within the Xero app.
- Click on the Directions link in the top right hand corner of the map.
- The link opens Apple Maps (iOS) or Google Maps (Android) with directions from your current location to the contact’s address.
Xero + Google Authenticator
Security should be top of mind for everyone these days, regardless of whether you use online or desktop accounting software. Most people assume that desktop software is safer than online accounting software but in fact the reverse is true.
Online accounting software is far better protected against ransomware, viruses and data theft than the desktop accounting file sitting on your hard drive.
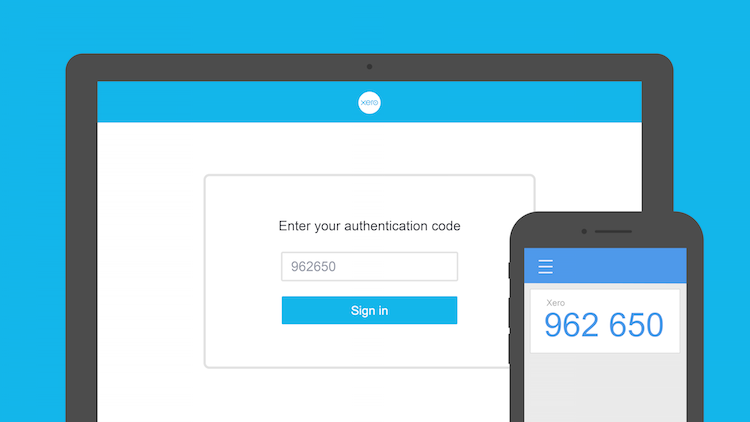
Xero uses a Google app called Google Authenticator to boost security even further. Two-step authentication (better known in IT circles as two-factor authentication or 2FA) requires a user to enter a temporary password created by a trusted device, usually a smartphone.
Google Authenticator randomly generates a six digit number that changes every 30 seconds as a secondary password to your regular password.
This means that if someone knows your work email address and guesses your password they still can’t access your Xero file. They would also need to steal your mobile phone, unlock the phone with your smartphone code, launch Google Authenticator and enter the random number.
This is obviously a much tougher task for a hacker sitting behind their computer in Vladivostok or Shanghai.
What happens if you lose your smartphone and can’t enter your secondary passcode? When Xero asks you for the Google Authenticator passcode click “I can't use my authentication app”. Xero will then ask you a series of security questions to prove your identity. Once in Xero turn off two-step authentication until you find or buy another smartphone.
How to set up Xero and Google Authenticator
- Download Google Authenticator from your App Store on your smartphone. (Windows Phones download Windows Authenticator.)
- Open the app and follow the instructions to set it up. You can read the instructions as well.
- In Xero, click on [Your Name] in the top right corner and select Account.
- Under the Two-step authentication heading, click Setup.
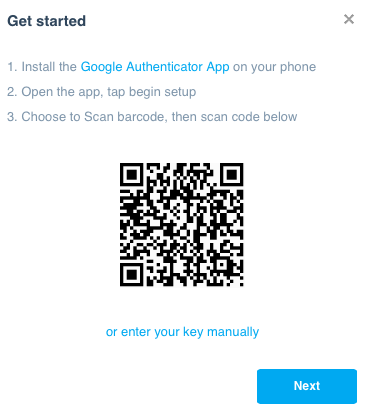
- Scan the QR code that now displays in Xero with the authenticator app on your phone. (You can also enter your secret key manually and add these details to your authenticator app.) Click Next.
- Enter the authentication code provided by Google Authenticator into Xero, then click Next.
- Select your three security questions and type answers, then click Next. If you don't have your phone or the code is not working you can answer these questions instead.
- Click Done.
Tip: How to log into Xero with Google Authenticator
- Log in to Xero.
- On your phone, open Google Authenticator, and enter the six-digit code into Xero. If you want to identify this as a trusted computer, click the checkbox Remember me for 30 days. This only applies when using the same device with the same browser.
- Click Sign In. If you fail to log in five times, we'll lock your account temporarily. You can try again in two hours.
Xero + Google Apps
Another a bonus tip. Here’s how to launch Xero from Gmail, Google Docs, Google Sheets, etc. with two clicks.
You can log into Xero by connecting it to Google Apps, a process called Single Sign-on because you only need to log into Google Apps. Google Apps is like an online version of Microsoft Office; it includes email (Gmail), word processing (Google Docs), spreadsheets (Google Sheets), and presentations (Google Slides), plus several other apps you don’t find in Office.
You can connect your Google ID to your Xero account for a faster and more convenient way to login. Instead of entering Xero.com into your browser, clicking login and entering your password, you just select Xero from the menu in the top right corner of any Google Apps screen.
For extra security, I strongly recommend setting up two-step authentication with Google Apps. You can do this yourself if you have admin access or ask your IT support to do it for you.
N.B. This only works with Google Apps, Google’s paid-for productivity suite. It won’t work with a free Gmail account.
And you must use the same email address to log in to both Google Apps and Xero. Change your Xero login email address to match your Google Apps email if you use different email addresses.
How to Connect Xero to Google Apps
- Visit Google Apps Marketplace and search for Xero. Here’s the link https://apps.google.com/marketplace/search/xero.
- If this is your first time accessing Xero through Google Apps, Xero will ask you to either:
- log in to Xero if your Xero account uses your Google Apps email, or
- create a password (to add a Xero account) if you don't use Xero.
If Xero prompts you to create a password and you already use Xero, it means your Google Apps login and Xero login don't match. You'll need to log in to Xero, change your email address, then access Xero from Google Apps again.
3. Once installed, you can click on on the Google Apps icon on any Google apps screen, then click More to access Xero directly.
Tip: How to log into Xero from a Google Apps screen
- From Gmail, Google Docs, etc. click on the square made up of nine dots in the top right corner. It’s between your name and your picture.
- Scroll to the bottom of the pop-up menu until you reach the panel “More from Apps Marketplace”. Click on the Xero icon.
Here's The Next Step
If you take the time to set up these connections between Google and Xero you will find yourself saving small amounts of time here and there, which all adds up. Particularly if you encourage your staff to do the same. And, with two-step authentication, you will be much safer.
I have created two free step-by-step cheat sheets that outline the exact process outlined in this post. You can send around to your employees to make these productivity improvements themselves. Or you can forward them to your clients to help them save time using Xero.
Just enter your email and hit the download button below to get the free checklists.
Exclusive Bonus: Download the two step-by-step checklists that show you how to connect and use Google Maps and Gmail with Xero. Feel free to share with your staff or clients.